1099 filling for Therapy providers
In the world of healthcare and therapeutic services, agencies providing Applied Behavior Analysis (ABA), Mental Health, Occupational, and Speech Therapy play a crucial role in enhancing the well-being of individuals. However, behind the scenes, there is an intricate web of compliance requirements, especially when it comes to managing payments for independent contractors. In this blog post, we will explore the compliance landscape for these providers and discuss how the payments feature of Office Puzzle can serve as a valuable tool for maintaining accurate records and simplifying the 1099 filing process.
Understanding Compliance for Independent Contractors:
For organizations in this field, compliance is not just a buzzword; it is a critical aspect of operations. Independent contractors, often engaged by these enterprises, require meticulous management to ensure adherence to tax regulations. The IRS Form 1099 is a key document in this process, serving as a record of payments made to subcontracted providers during the fiscal year.
Challenges Faced by Agencies:
Varied Payment Structures: Independent contractors may receive payments based on hourly rates, sessions conducted, or specific services provided. Tracking these diverse payment structures can be challenging without a centralized system.
Record Keeping: Keeping accurate records of payments made to independent contractors is not only a compliance necessity but also crucial for financial transparency and accountability.
IRS Form 1099 Filings: Filing 1099s accurately and on time is a legal requirement, and any discrepancies may lead to penalties and legal ramifications.
Office Puzzle's Payments Feature: A Compliance Solution
Office Puzzle, a comprehensive office management tool, offers a specialized Payments feature designed to address the unique needs of these organizations.
 Streamlining Payment Processes
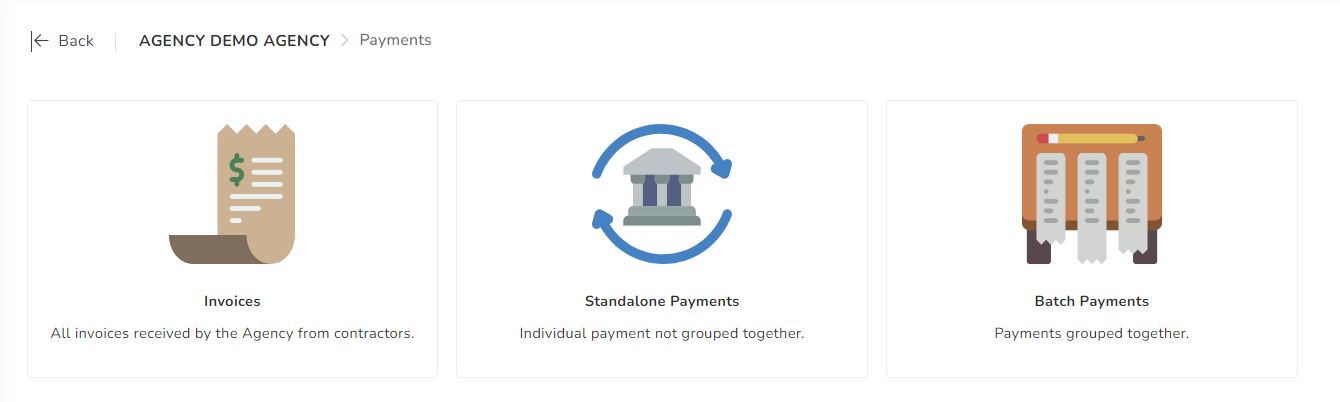
The Payments feature allows agencies to record invoices derived from the services provided by the independent contractors. Invoices created and recorded in Office Puzzle can be linked to events or visits previously recorded in the system, allowing the organization to categorize and track payments to independent contractors seamlessly. The system will automatically add details such as date and amount and allow users to input payment details, ensuring a centralized and easily accessible record of all transactions.
1099 Reporting
One of the standout features of Office Puzzle is its ability to generate payments reports that contain all the data required for the preparation of 1099 reports. By inputting payments made throughout the year, agencies can effortlessly generate accurate reports needed to prepare 1099 forms for their independent contractors come tax season. This significantly reduces the administrative burden and minimizes the risk of errors in the process.
Secure and Compliant
Security is paramount when dealing with sensitive financial information. Office Puzzle employs robust security measures to safeguard payment data, ensuring compliance with privacy regulations and instilling confidence in agencies and independent contractors alike.
Conclusion
In the fast-paced world of healthcare and therapy services, agencies must embrace tools that not only enhance operational efficiency but also ensure compliance with ever-evolving regulations. The Payments feature of Office Puzzle emerges as a valuable ally for agencies offering a streamlined solution to manage payments, maintain accurate records, and simplify the often-daunting task of 1099 filing for independent contractors.
As agencies navigate the complex landscape of compliance, understanding the IRS regulations governing 1099 reporting is essential. The IRS provides comprehensive information on Form 1099 reporting on their official website. For detailed guidance on filing requirements, deadlines, and other pertinent information, you can refer to the IRS Form 1099 General Instructions available here.
Having a dependable partner like Office Puzzle can make all the difference in fostering success and sustainability. By combining the convenience of modern technology with a commitment to compliance, agencies can confidently navigate the intricacies of payment management and ensure seamless 1099 reporting when tax season arrives.
Leveraging Data Collection
In the realm of ABA and Rehabilitative therapies (Mental health, Mental, OT, PT and Speech), data collection is a vital component of providing effective care. Regardless of the type of therapy, meticulous data collection can make all the difference in achieving positive outcomes for patients. Office Puzzle was designed to streamline and enhance the data collection processes. In this article, we'll explore the crucial role of data collection in therapies and how Office Puzzle simplifies this essential task.
The Significance of Data Collection
Progress Monitoring: The heart of ABA and Rehabilitative therapies is tracking patient progress. Whether it's a child with autism in ABA therapy or a patient recovering from a stroke in OT, detailed data collection allows therapists to monitor and adjust treatment plans in real time. This ensures that the therapy remains effective and tailored to individual needs.
Evidence-Based Decision-Making: Data collection in Rehabilitative therapies and ABA, is not just about jotting down numbers; it's about gathering evidence to make informed decisions. Therapists can analyze this data to identify patterns, strengths, and areas that require adjustments, resulting in more effective therapy strategies.
Compliance and Quality Assurance: Compliance with regulations and quality assurance are non-negotiable. Proper data collection serves as a safeguard, ensuring that therapy services meet all necessary standards and are delivered by qualified professionals. Therapists must meticulously collect and maintain data to ensure that their patients receive the financial support they require for their treatments. Proper data collection not only benefits patients but also contributes to a more efficient and transparent healthcare system, where quality care is duly recognized and compensated.
Communication and Collaboration: For many ABA therapy providers, collaboration is essential. Data collected within the therapy session provides a common language for therapists, caregivers, and other stakeholders to communicate about a patient's progress and adapt the therapy plan as needed.
How Office Puzzle Enhances Data Collection
Office Puzzle understands the importance of efficient data collection in ABA and Rehabilitative therapies and offers several features that simplify this process:
Customizable Data Forms: Office Puzzle provides customizable data entry forms, allowing therapists to tailor data collection to the specific needs of their patients and their plans. This flexibility ensures that the platform can accommodate various therapy types and patient requirements and also coexistence and interaction between those therapies, plans, and services.
Real-Time Data Entry: Therapists can record data in real time during therapy sessions, eliminating the need for manual data entry later. This not only saves time but also reduces the risk of errors. Office Puzzle's technology and its real time simple data collection allows providers to shift their attention to the patient during the session instead of looking at a data sheet.
Secure Data Storage: Office Puzzle stores patient data securely, ensuring compliance with data privacy regulations, like HIPAA. Therapists can access this data when required, knowing it's protected.
Automated Reports: The software generates automated reports, providing therapists with insights into patient progress. These reports can be easily shared with caregivers, enhancing transparency and collaboration.
Comprehensive Analytics: Office Puzzle includes analytics tools that allow therapists to analyze patient data over time. This enables evidence-based decision-making and the adjustment of treatment plans for better outcomes
Progress charts: Office Puzzle offers a diverse array of graphics to its users, derived from the meticulous collection of data and automatic tracking mechanisms. These graphics serve as invaluable tools for users to gauge their progress and master their objectives effectively, and visually depict performance trends over time, allowing users to identify patterns and areas of improvement. Additionally, there are line and bar graphs displaying data on objective completion, enabling users to grasp the distribution of their achievements. Moreover, automatic tracking systems generate timelines, effectively marking significant milestones and showcasing the journey towards mastering specific goals with precision.
Data collection in ABA and Rehabilitative therapies is the foundation for progress, compliance, and quality. With Office Puzzle software, therapy providers can streamline this essential task, allowing therapists to focus on what truly matters: delivering high-quality care and improving patient outcomes. Office Puzzle serves as a valuable ally in the journey of providing ABA and Rehabilitative therapies services, making data collection efficient, accurate, and empowering therapy providers to achieve better results for their patients. Embrace the power of data collection and simplify your practice with Office Puzzle.

The Vital Importance of Mandatory Documentation for Therapy providers
In the world of healthcare, accuracy, compliance, and professionalism are paramount. Whether you're an Applied Behavior Analysis (ABA), Mental, Occupational (OT), or Speech (SP) therapy agency, maintaining detailed and up-to-date records of your providers is not just good practice—it's essential. Here, we'll delve into the reasons why mandatory documentation is crucial for agencies and how Office Puzzle, a specialized practice management software, can streamline this process, ensuring your organization stays in compliance.
Why Mandatory Documentation Matters
- Regulatory Compliance
Applied Behavior Analysis, Mental, Occupational and Speech (SP) therapy agencies are subject to stringent regulations, which require them to maintain comprehensive documentation of their providers. These regulations serve several critical purposes:
a. Legal Compliance: Staying in line with local, state, and federal regulations is vital for avoiding fines, legal troubles, or even losing your agency's license or credentials with health insurance providers. Mandatory documentation helps prove that you are adhering to all necessary guidelines.
b. Quality Assurance: Mandatory documentation ensures that all providers meet the required qualifications and certifications. This, in turn, enhances the quality of services offered to clients.
- Credential Verification
Documenting the credentials, licenses, certifications, and training of your therapy providers is essential for verifying their qualifications. This verification process not only helps in meeting regulatory requirements but also builds trust with clients and their families.
- Risk Management
Agencies face various risks, including legal liabilities and reputation damage. Mandatory documentation can mitigate these risks by providing a clear record of each provider's qualifications and compliance with agency policies and procedures.
- Billing and Reimbursement
Accurate documentation of providers' qualifications and certifications is crucial for billing and reimbursement purposes. Insurance companies and government agencies often require detailed documentation to ensure that services rendered are eligible for reimbursement.
How Office Puzzle Can Help
Office Puzzle is a specialized practice management software designed specifically for behavioral, occupational, mental, and speech therapy agencies. One of its standout features is the Human Resources documentation module, which can greatly assist agencies in managing mandatory documentation effectively.
- Expiration Date Tracking
Office Puzzle allows you to easily track expiration dates for licenses, certifications, and other mandatory documents. By inputting these dates into the system, you can set up automatic reminders, ensuring that you are always aware of when a provider's credentials are due for renewal.
- Automatic Reminders
One of the most significant benefits of Office Puzzle's Human Resources documentation feature is its ability to send automatic reminders. When a provider's credential is about to expire, the software can send notifications to both the provider and agency administrators. This ensures that you never miss an important renewal date, reducing the risk of non-compliance.
- Streamlined Compliance
With Office Puzzle, you can maintain a centralized repository of all provider documents, making it easy to access and update information as needed. This centralized approach simplifies the compliance process, saving your agency time and effort.
- Enhanced Accountability
By utilizing Office Puzzle, agencies can establish a culture of accountability among their providers. When providers are aware that their documents are being tracked and monitored, they are more likely to stay proactive about renewing their credentials.
Mandatory documentation is not just a regulatory requirement; it's a vital component of running a successful and compliant therapy agency. With the help of Office Puzzle's Human Resources documentation feature, agencies can streamline the process of tracking expiration dates, sending automatic reminders, and staying in compliance. By leveraging this powerful practice management software, therapy agencies can focus more on providing high-quality services to their clients, while the administrative burden of mandatory documentation is effectively managed. Don't risk the integrity and reputation of your therapy agency—invest in robust documentation management today.

Streamlining Session Note Creation, Review, and Approval
In the dynamic world of therapy, where every session holds the potential for significant progress, efficiency is paramount. For therapy providers, the ability to streamline session note creation, review, and approval processes is a game-changer. This is precisely where Office Puzzle, a practice management software with workflow and document approval capabilities, shines. Let's explore how Office Puzzle can empower therapy providers to deliver high-quality therapy while closely monitoring patient progress.
The Heart of Therapy: Session Notes
Session notes are the lifeblood of therapy. They are the tangible records of each patient's journey toward their goals, documenting strategies, observations, and outcomes. These notes serve multiple critical purposes:
- Individualized Treatment Plans: Session notes are the basis for developing and fine-tuning individualized treatment plans. They help therapy providers tailor interventions to meet the specific needs and goals of each patient.
- Progress Monitoring: Regularly updated session notes enable therapy providers to closely monitor patient progress. This data-driven approach allows for timely adjustments to treatment plans, ensuring optimal outcomes.
- Communication and Collaboration: Session notes facilitate communication among the therapy team, patients, and other stakeholders. They provide a clear picture of a patient's progress and inform decisions regarding interventions and support strategies.
- Documentation for Insurance and Compliance: Accurate and well-maintained session notes are essential for insurance claims and compliance requirements. They provide the necessary evidence of services rendered and progress made.
Office Puzzle: Simplifying Session Note Management
Now, let's delve into how Office Puzzle can revolutionize the way therapy providers create, review, and approve session notes:
- Streamlined Data Entry: Office Puzzle simplifies the process of entering session data. With customizable templates and intuitive interfaces, therapists can quickly input relevant information, reducing the administrative burden.
- Workflow Automation: The software's workflow capabilities enable therapy providers to create structured processes for session note review and approval. It ensures that the right individuals are involved at each step, enhancing collaboration and accountability.
- Document Approval: Office Puzzle's document approval feature allows for efficient review and approval of session notes. Supervisors and authorized personnel can easily review and provide feedback, ensuring accuracy and compliance.
- Version Control and Audit Trails: The software maintains version control and audit trails for session notes, providing a clear history of changes and approvals. This transparency enhances accountability and simplifies compliance reporting.
The Importance of Streamlined Session Notes
Efficient session note management is not just about administrative convenience; it's about elevating the quality of care provided to patients:
- Improved Focus on Patients: By reducing administrative burdens and automating workflows, therapy providers can dedicate more time and attention to their patients. This leads to more meaningful interactions and therapy sessions.
- Real-Time Progress Tracking: Office Puzzle enables real-time progress tracking through up-to-date session notes. This allows for immediate adjustments to treatment plans based on data-driven insights.
- Enhanced Collaboration: Streamlined session note processes promote collaboration among therapy teams, fostering a cohesive approach to patient care.
- Compliance and Documentation: Accurate and compliant session notes are crucial for insurance claims and regulatory requirements. Office Puzzle ensures that these critical elements are met consistently.
In conclusion, Office Puzzle is a powerful ally for therapy providers looking to optimize their workflow for session note creation, review, and approval. By simplifying these processes, therapy providers can focus on what truly matters: delivering high-quality therapy and closely monitoring the progress of their patients. It's not just about efficiency; it's about enhancing the impact of therapy and improving the lives of those it serves.